Wednesday, 30 April 2014

Get multiple result sets from Mysql stored procedure in Yii PHP Framework

Loop through returned sql results set using nextResult()

PHP:

Method 1: 

        $command = Yii::app()->db->createCommand("CALL sp_getstudentdetails('view')");
        $resultSet = $command->query();

        // retrieving all rows at once in a single array
        $array1 = $resultSet->readAll();
        var_dump($array1); //Dumps information about a variable
        
        $resultSet->nextResult(); //Return if there is another result 

        // retrieving all rows at once in a single array
        $array2 = $resultSet->readAll();
        var_dump($array2); //Dumps information about a variable


Method 2: 

        $command = Yii::app()->db->createCommand("CALL sp_getstudentdetails('view')");
        $resultSet = $command->query();
        
        // calling read() repeatedly until it returns false
        while (($row = $resultSet->read()) !== false) {
            var_dump($row);
        }

        $resultSet->nextResult();

        while (($row = $resultSet->read()) !== false) {
            var_dump($row);
        }


Mysql Stored Procedure:

drop procedure if exists sp_getstudentdetails;
DELIMITER $$

CREATE PROCEDURE sp_getstudentdetails(
in  p_mode varchar(100))
BEGIN

IF p_mode = 'view' THEN
   select * from student; /* first select query  */
   select * from studentdetails;  /* second select query */
END IF;

END$$

DELIMITER $$

Related Links:
How to call Mysql Stored Procedure with parameters in Yii PHP Framework

How to call Mysql Stored Procedure with parameters in Yii PHP Framework

How to call Mysql stored procedure with parameters in Yii PHP Framework:

Mysql Stored Procedure:

drop procedure if exists sp_getstudentdetails;
DELIMITER $$

CREATE PROCEDURE sp_getstudentdetails(
in  p_mode varchar(100))
BEGIN

IF p_mode = 'view' THEN
   select * from student;
END IF;

END$$

DELIMITER $$

PHP:

$mode = 'view';

$command = Yii::app()->db->createCommand("CALL sp_getstudentdetails(:p_mode)");
$command->bindParam(":p_mode", $mode, PDO::PARAM_INT);
$data = $command->queryAll();

(or)

$command = Yii::app()->db->createCommand("CALL sp_getstudentdetails(:p_mode)");
$data = $command->->queryAll(array(':p_mode' => $mode));
Related Links:
Get multiple result sets from Mysql stored procedure in Yii PHP Framework

Monday, 28 April 2014

Create Pdf file using Tcpdf plugin in php Yii framework

Create Pdf file using Tcpdf plugin in php Yii framework

public function actionCreatePdf() {
        $path = Yii::app()->basePath;
        require_once($path . '/extensions/tcpdf/tcpdf.php');
        $pdf = new TCPDF();
        $pdf->SetCreator(PDF_CREATOR);
        $pdf->SetAuthor('Nicola Asuni');
        $pdf->SetTitle('TCPDF Example 001');
        $pdf->SetSubject('TCPDF Tutorial');
        $pdf->SetKeywords('TCPDF, PDF, example, test, guide');
        $pdf->SetHeaderData('', 0, PDF_HEADER_TITLE, '');
        $pdf->setHeaderFont(Array('helvetica', '', 8));
        $pdf->setFooterFont(Array('helvetica', '', 6));
        $pdf->SetMargins(15, 18, 15);
        $pdf->SetHeaderMargin(5);
        $pdf->SetFooterMargin(10);
        $pdf->SetAutoPageBreak(TRUE, 0);
        $pdf->SetFont('dejavusans', '', 7);
        $pdf->AddPage();
        $pdf->SetFillColor(255, 0, 0);
        $pdf->SetTextColor(0);
        $pdf->SetDrawColor(128, 0, 0);
        $pdf->SetLineWidth(0.1);
        $pdf->SetFont('');
        // Header
        $tbl_header = '<table border="1">';
        $tbl_footer = '</table>';
        // Data        
        $tbl = '';

        $sql = "select * from student";
        $data = Yii::app()->db->createCommand($sql)->queryAll(); 

        for ($i = 0; $i < count($data); $i++) {
            $tbl .= '<tr>' .
                    '<td>' . $data[$i]['name'] . '</td>' .
                    '<td>' . $data[$i]['age'] . '</td>' .
                    '<td>' . $data[$i]['mark1'] . '</td>' .
                    '<td>' . $data[$i]['mark2'] . '</td>' .
                    '<td>' . $data[$i]['mark3'] . '</td>' .
                    '</tr>';
        }

        $pdf->writeHTML($tbl_header . $tbl . $tbl_footer, true, false, false, false, '');
        $pdf->Output("Student_Details.pdf", "D");
        Yii::app()->end();
    }

Find more examples related to phpexcel from here

Related Links:

Create Excel File with PHPExcel Plugin Yii Framework

CGridView display data from database in Yii PHP Framework

Create Excel File with PHPExcel Plugin Yii Framework

Create Excel File with PHPExcel Plugin Yii Framework:

public function actionCreateExcel() {
        Yii::import('ext.phpexcel.XPHPExcel');
        $objPHPExcel = XPHPExcel::createPHPExcel();
        $objPHPExcel->getProperties()->setCreator("Arunsri")
                ->setLastModifiedBy("Arunsri")
                ->setTitle("Office 2007 XLSX Test Document")
                ->setSubject("Office 2007 XLSX Test Document")
                ->setDescription("Test document for Office 2007 XLSX, generated using PHP classes.")
                ->setKeywords("office 2007 openxml php")
                ->setCategory("Test result file");

        // Add some data
        $objPHPExcel->setActiveSheetIndex(0)
                ->setCellValue('A1', 'Name')
                ->setCellValue('B1', 'Age')
                ->setCellValue('C1', 'Mark1')
                ->setCellValue('D1', 'Mark2')
                ->setCellValue('E1', 'Mark3');

        $sql = "select * from student";
        $datas = Yii::app()->db->createCommand($sql)->queryAll();        

        for ($i = 0; $i < count($datas); $i++) {
            $j = $i + 2;
            $objPHPExcel->setActiveSheetIndex(0)
                    ->setCellValue('A' . $j, $datas[$i]['name'])
                    ->setCellValue('B' . $j, $datas[$i]['age'])
                    ->setCellValue('C' . $j, $datas[$i]['mark1'])
                    ->setCellValue('D' . $j, $datas[$i]['mark2'])
                    ->setCellValue('E' . $j, $datas[$i]['mark3']);
        }

        $styleArray = array(
            'font' => array(
                'bold' => true,
            ),
            'borders' => array(
                'allborders' => array(
                    'style' => PHPExcel_Style_Border::BORDER_THIN
                ),
            ),
        );

        $objPHPExcel->getActiveSheet()->getStyle('A1:E1')->applyFromArray($styleArray);
        
        // uncomment the following to include image in sheet 2
        /*
          // Create new sheet in current excel file
          $objPHPExcel->createSheet(1);
          $objPHPExcel->setActiveSheetIndex(1);
          $objPHPExcel->getSheet(1)->setTitle('Image');

          //To Insert an image in excelsheet
          $objDrawingPType = new PHPExcel_Worksheet_Drawing();
          $objDrawingPType->setWorksheet($objPHPExcel->setActiveSheetIndex(1));
          $objDrawingPType->setName("Pareto By Type");
          $objDrawingPType->setPath(Yii::app()->basePath . DIRECTORY_SEPARATOR . "../images/logo.png");
          $objDrawingPType->setCoordinates('B2');
          $objDrawingPType->setOffsetX(1);
          $objDrawingPType->setOffsetY(5);
         */

        // Rename worksheet
        $objPHPExcel->getSheet(0)->setTitle('Data');

        // Set active sheet index to the first sheet, so Excel opens this as the first sheet
        $objPHPExcel->setActiveSheetIndex(0);

        // Redirect output to a client’s web browser (Excel5)
        header('Content-Type: application/vnd.ms-excel');
        header('Content-Disposition: attachment;filename="GridData.xls"');
        header('Cache-Control: max-age=0');
        // If you're serving to IE 9, then the following may be needed
        header('Cache-Control: max-age=1');

        // If you're serving to IE over SSL, then the following may be needed
        header('Expires: Mon, 26 Jul 1997 05:00:00 GMT'); // Date in the past
        header('Last-Modified: ' . gmdate('D, d M Y H:i:s') . ' GMT'); // always modified
        header('Cache-Control: cache, must-revalidate'); // HTTP/1.1
        header('Pragma: public'); // HTTP/1.0

        $objWriter = PHPExcel_IOFactory::createWriter($objPHPExcel, 'Excel5');
        $objWriter->save('php://output');
        Yii::app()->end();
    }


Reference Documentation:

Click here for phpexcel reference documentation


Related Links:

Create Pdf file using Tcpdf plugin in php Yii framework

CGridView display data from database in Yii PHP Framework


Sunday, 27 April 2014

CButtonColumn in CGridView

CButtonColumn in CGridView:

          In previous post describes how to load data in the CGrideView and to perform CRUD functionality we need grid buttons for view, edit, delete.

Link for CGridView to load data from database.

then add the following lines inorder to get the buttons in gridview.

<?php

$this->widget('zii.widgets.grid.CGridView', array(
    'id' => 'student-grid',
    'dataProvider' => $model->getDisplayData(),
    //'filter' => $model,
    'selectableRows' => 2,
    'columns' => array(
        array(
            'header' => 'S.No',
            'value' => '$this->grid->dataProvider->pagination->currentPage * $this->grid->dataProvider->pagination->pageSize + ($row+1)'
        ),
        array(
            'name' => 'id',
            'header' => 'ID'
        ),
        array(
            'name' => 'name',
            'header' => 'Student Name'
        ),
        array(
            'name' => 'age',
            'header' => 'Age'
        ),
        array(
            'name' => 'mark1',
            'header' => 'Mark1'
        ),
        array(
            'name' => 'mark2',
            'header' => 'Mark2'
        ),
        array(
            'name' => 'mark3',
            'header' => 'Mark3'
        ),
        array('class' => 'CButtonColumn',
            'viewButtonUrl' => 'Yii::app()->controller->createUrl("site/view",array("id"=>$data["id"]))',
            'updateButtonUrl' => 'Yii::app()->controller->createUrl("site/sample",array("id"=>$data["id"]))',
            'deleteButtonUrl' => 'Yii::app()->controller->createUrl("site/delete",array("id"=>$data["id"]))',
        )
    ),
));
?>

Link for CButtonColumn Documentation

        Create actions for the View, edit, delete and map the actions in the craeteurl property of the CButtonColumn and send number of parameters with array.

Related Links:

CGridView display data from database in Yii PHP Framework

How to configure / install PHP Yii Framework on Netbeans


CGridView display data from database in Yii PHP Framework

CGridView display data from database in Yii PHP Framework

Step 1: Create a php project using Yii Framework.(Example:  'studentdetails')

Step 2: Create a database named 'sample' in Mysql or use the existing database.

Step 3: Create a table named as 'studentdetails' in sample DB and Insert the following queries.

CREATE TABLE `studentdetails` (
`id` INT(11) NOT NULL AUTO_INCREMENT,
`name` VARCHAR(100) NOT NULL,
`age` INT(11) NOT NULL,
`mark1` INT(11) NOT NULL,
`mark2` INT(11) NOT NULL,
`mark3` INT(11) NOT NULL,
PRIMARY KEY (`id`)
)

INSERT INTO `studentdetails` (`name`, `age`, `mark1`, `mark2`, `mark3`) VALUES
('Student1', 14, 68, 85, 68),
('Student2', 15, 89, 89, 85),
('Student3', 14, 89, 89, 85),
('Student4', 15, 89, 89, 85);


Step 4: Open your config page in the following directory D:\xampp\htdocs\studentdetails\protected\config\main.php and edit the file as follows.

'db' => array(
            'connectionString' => 'mysql:host=localhost;dbname=sample',
            'emulatePrepare' => true,
            'username' => 'root',
            'password' => '',
            'charset' => 'utf8',
        ),

Step 5: Create a model file in the name 'studentForm.php' in the following   directory D:\xampp\htdocs\studentdetails\protected\models\studentForm.php and the content as follows.

<?php
class studentForm extends CFormModel {
    public $name;
    public $age;
    public $mark1;
    public $mark2;
    public $mark3;
    public function getDisplayData() {
        $sql = "select * from studentdetails";
        $rawdata = Yii::app()->db->createCommand($sql)->queryAll();
        $data = new CArrayDataProvider($rawdata, array(
            'keyField' => 'id',
            'sort' => array(//optional and sortring
                'attributes' => array(
                    'id', 'name', 'age', 'mark1', 'mark2', 'mark3'),
            ),
            'pagination' => array('pageSize' => 10))
        );
        return $data;
    }
}
?>

Step 6: Create view file named as 'student.php' in the following   directory D:\xampp\htdocs\studentdetails\protected\views\site\student.php and the content as follows.

<?php
$this->widget('zii.widgets.grid.CGridView', array(
    'id' => 'student-grid',
    'dataProvider' => $model->getDisplayData(),
    //'filter' => $model,
    'selectableRows' => 2,
    'columns' => array(        
        array(
            'header' => 'S.No',
            'value' => '$this->grid->dataProvider->pagination->currentPage * $this->grid->dataProvider->pagination->pageSize + ($row+1)'
        ),
        array(
            'name' => 'id',
            'header' => 'ID'            
        ),
        array(
            'name' => 'name',
            'header' => 'Student Name'
        ),
        array(
            'name' => 'age',
            'header' => 'Age'
        ),
        array(
            'name' => 'mark1',
            'header' => 'Mark1'
        ),
        array(
            'name' => 'mark2',
            'header' => 'Mark2'
        ),
        array(
            'name' => 'mark3',
            'header' => 'Mark3'
        )
    ),
));
?>

Click here for CGridView Documentation

Step 7: Add a new action in the siteController class in the following directory D:\xampp\htdocs\studentdetails\protected\controllers\SiteController.php 

public function actionStudent() {
    $model = new studentForm;
    $this->render('student', array('model' => $model));


Step 8: Add a new menu in the layout by editing the following file 'main.php' in the following directory D:\xampp\htdocs\studentdetails\protected\views\layouts\main.php 

<?php $this->widget('zii.widgets.CMenu',array(
'items'=>array(
array('label'=>'Home', 'url'=>array('/site/index')),
                                array('label'=>'Student Details', 'url'=>array('/site/student')),
array('label'=>'About', 'url'=>array('/site/page', 'view'=>'about')),
array('label'=>'Contact', 'url'=>array('/site/contact')),
array('label'=>'Login', 'url'=>array('/site/login'), 'visible'=>Yii::app()->user->isGuest),
array('label'=>'Logout ('.Yii::app()->user->name.')', 'url'=>array('/site/logout'), 'visible'=>!Yii::app()->user->isGuest)
),
)); ?>

Step 9: Run the application and see the result.


Thursday, 17 April 2014

How to Cofigure Xdebug in Netbeans for Debugging.

Cofigure Xdebug in Netbeans for Debugging.

Step 1: Install the Xampp Latest Version. in this post I have Installed Xampp in the D:\xampp Directory.

Step 2: Search for the file php_xdebug.dll in the following directory D:\xampp\php\ext 

           If the file exist then you dont have to download the xdebug file otherwise you have to download the file from the following URL: (http://xdebug.org/download.php)

Step 3: open php.ini file from the directory D:\xampp\php. In that file search for the name Xdebug or scroll down to the last section of the page containing code for Xdebug configuration.


Uncomment the above lines by removing the semicolen(;) in the start of the line and change the these code into following:

[XDebug]
zend_extension = "D:\xampp\php\ext\php_xdebug.dll"
xdebug.profiler_append = 0
xdebug.profiler_enable = 1
xdebug.profiler_enable_trigger = 0
xdebug.profiler_output_dir = "D:\xampp\tmp"
xdebug.profiler_output_name = "cachegrind.out.%t-%s"
xdebug.remote_enable = 1
xdebug.remote_handler = "dbgp"
xdebug.remote_host = "127.0.0.1"
xdebug.trace_output_dir = "D:\xampp\tmp"
xdebug.idekey="netbeans-xdebug" 
xdebug.remote_port = 9000

make sure to check the zend_extension refers to the php_xdebug.dll and check for the direcory names and change the xdebug.remote_enable = 1 (from 0) and add the following two lines in the end.

xdebug.idekey="netbeans-xdebug" 
xdebug.remote_port = 9000

These two lines refers to the netbeans Session Id and Debuger Port as follows.


Uncheck the Stop at First Line to avoid the debug point goes to first point of the debug.

Now the debug starts..


and the debugging works..


Related Links:

How to configure / install PHP Yii Framework on Netbeans

How to configure / install PHP Yii Framework on Netbeans

Configure / install  PHP Yii Framework on Netbeans:

Softwares Required:

1. Netbeans Latest Version - (https://netbeans.org/downloads/)
2. PHP Yii framework plugin for Netbeans - (http://plugins.netbeans.org/plugin/47246/php-yii-framework-netbeans-phpcc)
3.Yii Framework - (http://www.yiiframework.com/)

Configuration Steps:

Step 1: Download Netbeans latest version and install it.

Step 2: Install PHP Yii Framework plugin in netbeans.
            Open Netbeans and go to Tools -> Plugins -> and Click Download Tab.
            There you can find Add Plugins.. button and browse fo the Yii framework plugin that downloaded.
            Then select that plugin and click the Install button. It will install the Yii Framework in netbeans.

Step 3: Configure Yii framework on Netbeans.

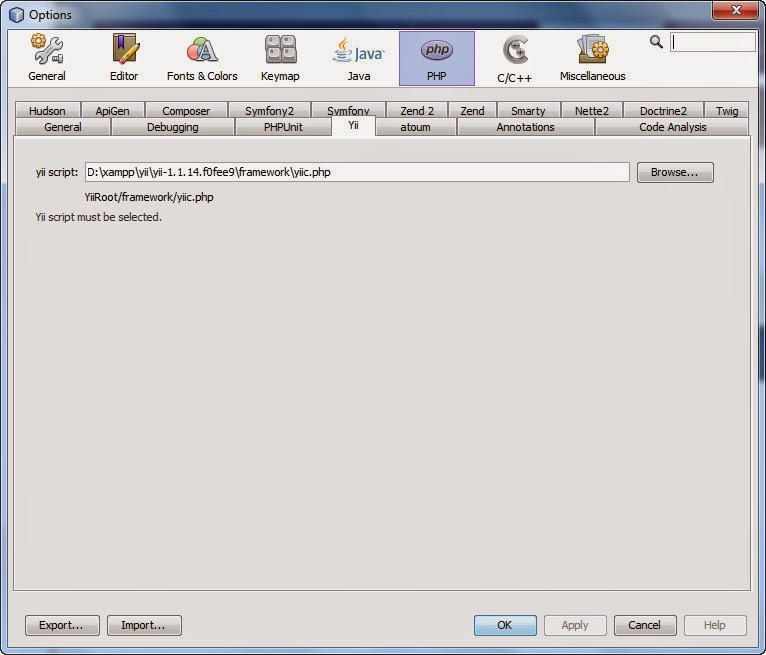
            In Netbeans, go to Tools -> Options -> and Click PHP Tab.
            Inside PHP tab there is tab called Yii. If the Yii tab appears then that means we installed the PHP Yii framework correctly.

            Before that, download the Yii framework and extract the source file and name that folder into Yii and save that folder somewhere near to web root Directory. I have Installed the Xampp in the D:\xampp Directory.

            Now in Netbeans Yii tab you have to add Yii script. Browse for that yii framework you downloded and find the following file inside that framework Yii\framework\yiic.php.


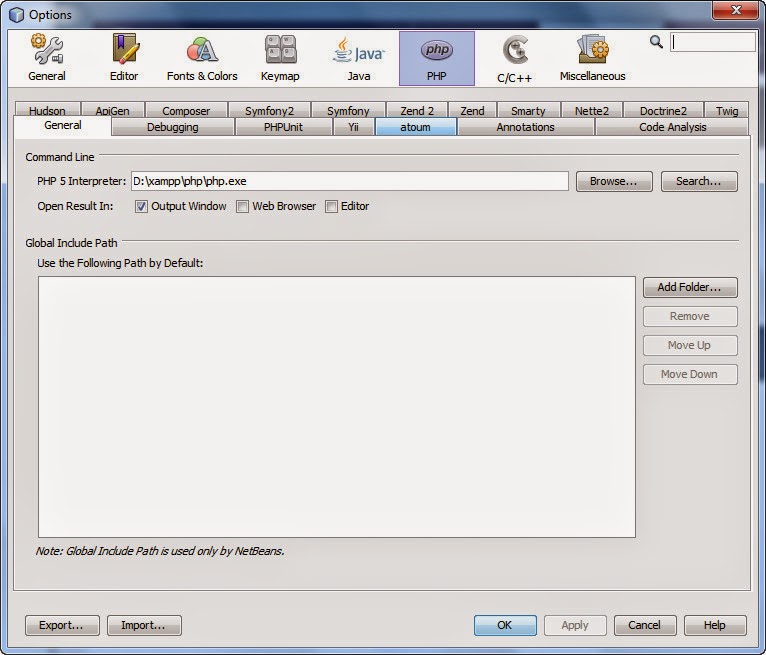
            In PHP tab make sure you provide the PHP Interpreter by Go to General Tab inside PHP Tab and Browse for the php.exe file that is installed in the Xampp Directory D:\xampp\php\php.exe.


Step 4: Create New PHP Project on Yii Framework.

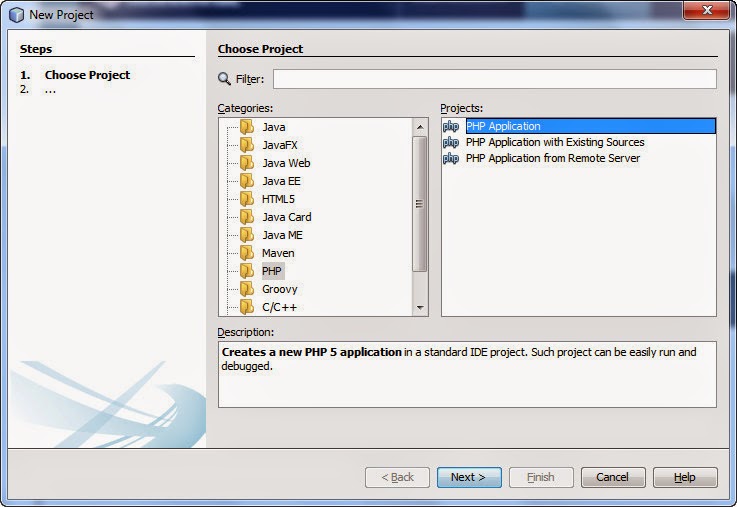
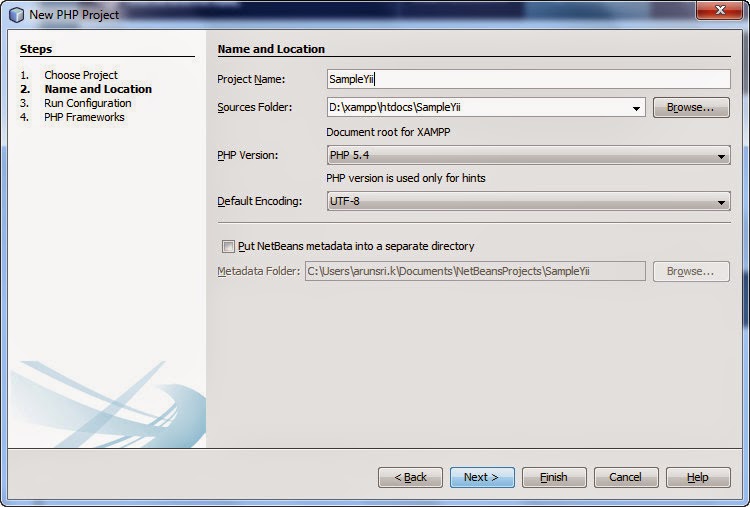
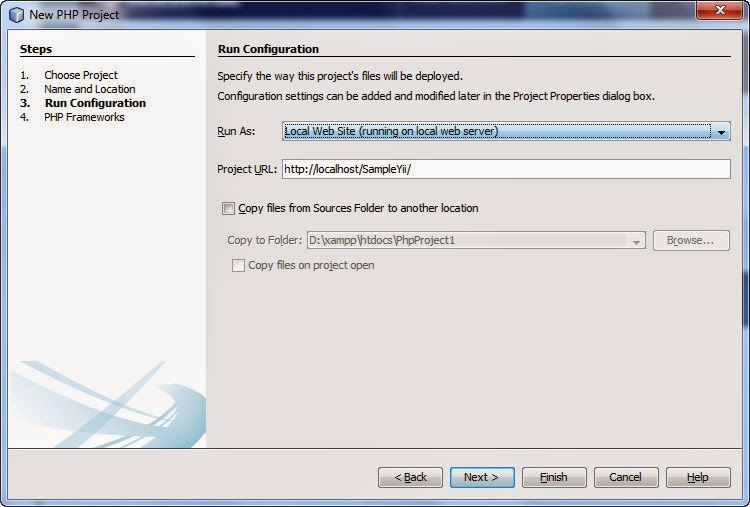
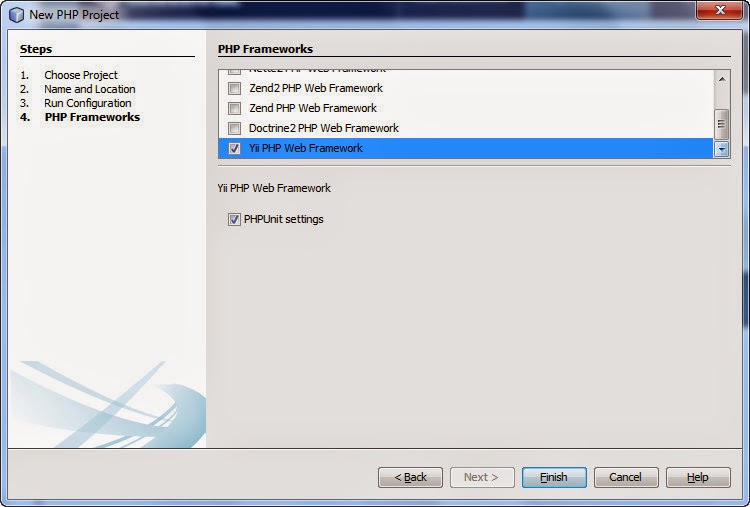
           Select File -> New Project -> and Choose PHP Application -> Name the Project -> Verify Configuration -> In PHP Framework Select Yii PHP Web Framework -> Finish and the Project created.


Related Links:

How to Cofigure Xdebug in Netbeans for Debugging

Wednesday, 9 April 2014

Free Bootstrap Admin Templates

Free Bootstrap Admin Templates:

               The following bootstrap admin templates are the best free admin templates that I found when I try to create a new project with bootstrap template which is responsive design.

AdminLTE Dasboard and Control Panel Template

  • Responsive admin template 
  • Free & open source 
  • Built with Bootstrap 3 
  • Easy to customize


Download & details: http://almsaeedstudio.com/


Metis Bootstrap admin template


TemplateVamp admin template

          TemplateVamp based on Twitter Bootstrap, TemplateVamp is a fully functional and customizable admin template that leverages the power and flexibility of HTML5 & CSS3. It can be used as a front-end toolkit for rapidly developing web applications that are lightweight, faster, and mobile-friendly; a great starting point.


SB Admin 2 : A Free Bootstrap Admin Theme


Charisma – free, responsive, multiple skin admin template

             Charisma is a fully featured, free, premium quality, responsive, HTML5 admin template (or backend template) based on Bootstrap from Twitter, it comes with 9 different themes to suit your style and application type.


Premium Bootstrap Admin Templates:

         Wrap Bootstrap contains many admin templates which is more beautiful than these free templates for around $15 to $20. If you are ready for Premium template go for it.


Wednesday, 2 April 2014

Check if a checkbox is checked in CheckboxList with javascript

Check if a checkbox is checked in CheckboxList with javascript


Description:
                  Find if the checkbox in the Checkboxlist is checked and has the text none or n/a and perform functionality in javascript.

ASPX:

<asp:CheckBoxList runat="server" ID="chkList" TabIndex="21" onclick="chkList_click();">
</asp:CheckBoxList>

JAVASCRIPT:

function chkList_click() {        
     // Get CheckboxList element        
     var elementRef = document.getElementById("<%=chkList.ClientID%>");          
     // Get input element inside the CheckboxList         
     var checkBoxArray = elementRef.getElementsByTagName('input');        
     // Iterate throught the CheckboxList input tag array        
     for (var i = 0; i < checkBoxArray.length; i++) {            
           // Get every checkbox by loop            
           var listControl = checkBoxArray[i];            
           if (listControl.type == "checkbox") { // Check if Checkbox                
                  if (listControl.checked == true) { // if checked true                   
                         //find Checkbox text.                    
                         var labelArray = listControl.parentElement.getElementsByTagName('label');                    
                         if (labelArray[0].innerHTML.toLowerCase() == 'none' ||                                                                  labelArray[0].innerHTML.toLowerCase().indexOf('n/a')  > -1) {                        
                                 // Your code here                        
                                 //checked = true;                        
                                 //break;                    
                         }                
                   }            
            }        
      } 
}